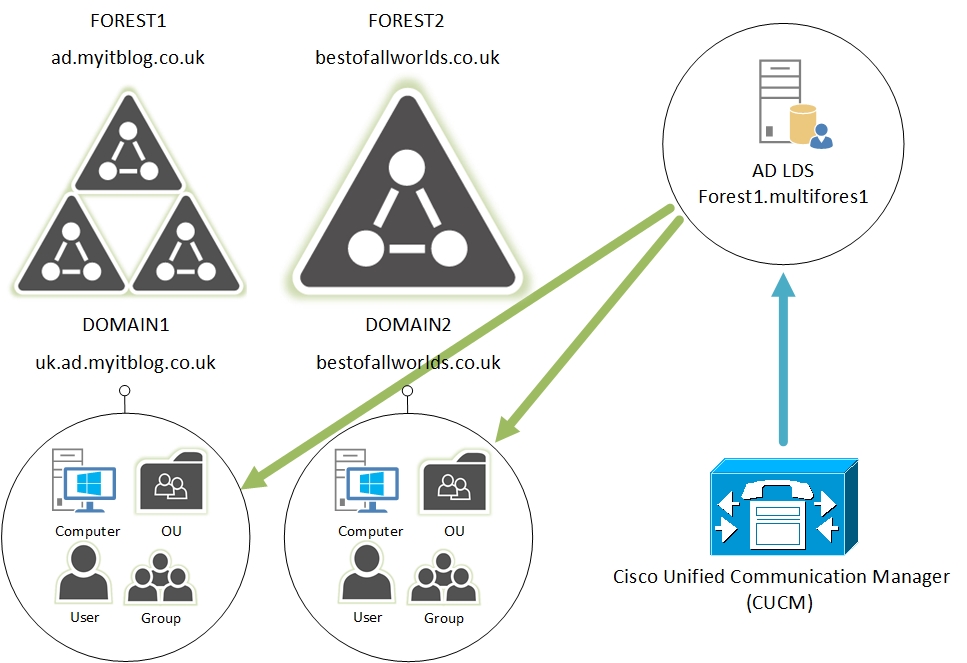
Only a single Active Directory Forest can be integrated with Cisco Unified Communication Manager (CUCM) to get user information and perform authentication.
In Multi-Forest environments you can utilize AD LDS (Lightweight Directory Services), formerly known as ADAM, to get user information and perform authentication from different AD domains that exist in different forests.
AD LDS is a Lightweight Directory Access Protocol (LDAP) directory service that provides flexible support for directory-enabled applications, without the dependencies that are required for Active Directory Domain Services (AD DS). AD LDS provides much of the same functionality as AD DS, but it does not require the deployment of domains or domain controllers. You can run multiple instances of AD LDS concurrently on a single computer, with an independently managed schema for each AD LDS instance.
This was my first time configuring AD LDS. Hence I had to reference a number of blog posts and a load of Microsoft documentation to get it working. In all honesty, it has been an absolute nightmare. I’m hoping this post will save you from all the headache I’ve endured.
The step-by-step instructions I’ve given below follow the official guide produced by Cisco. Make sure you have it open as you work through my instructions, as I do reference the Cisco guide often (there was no point in posting some of the same instructions in the Cisco guide).
1. Goal:
The environment I’ve deployed LDS in for the very first time, has 2 forests; one of the forests has a sub domain, and the other is a single forest / single domain deployment. The environment has a single instance of CUCM.
For the purposes of explaining the goal let’s assume the following:
Forest1 – ad.myitblog.local
Domain1 – uk.ad.myitblog.local
Forest2 / Domain2 – bestofallworlds.co.uk
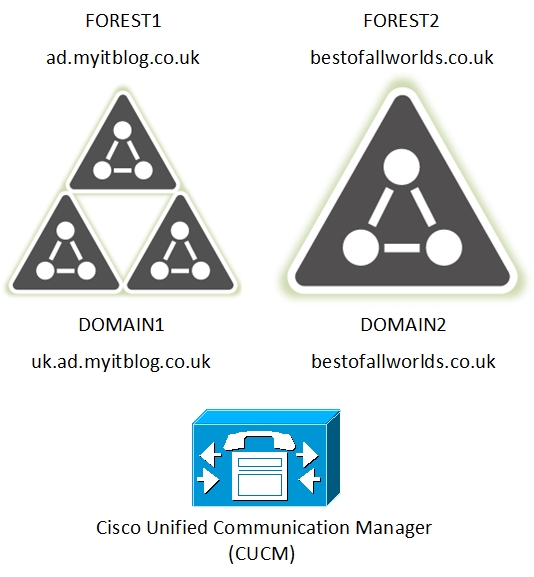
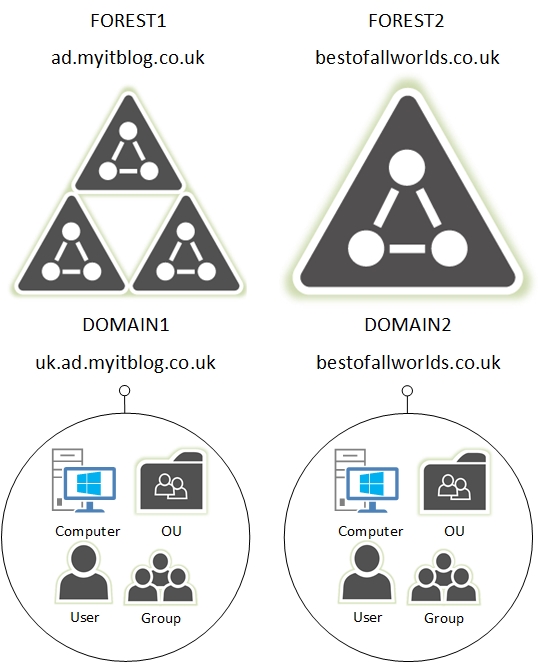
Both domains contain OU, User, Computer and Group objects. From a CUCM perspective, we are only interested in syncing the User OU and User objects residing in uk.ad.myitblog.co.uk (DOMAIN1) and bestofallworlds.co.uk (DOMAIN2) to CUCM.
As stated before, only a single Active Directory Forest can be integrated with Cisco Unified Communication Manager (CUCM). So we will deploy an LDS server in ad.myitblog.co.uk and configure an instance with partition name forest1.multiforest1. Configure LDS to sync across the User OU and User objects in both domains into the forest1.multiforest1 partition. Then configure CUCM to point at the LDS instance, setting our search base as dc=forest1,dc=multiforest1.
Just be aware though, as stated in the Cisco guide (Overview section), LDS won’t store passwords, all authentication requests are proxied to the relevant domain controller server.
My Recommendations:
- Deploy a server dedicated to the AD LDS role. If you have the luxury of a alternate datacentre, I would also recommend deploying a replica instance in the alternate datacentre (you can deploy a replica instance in the same datacentre as well). You can define multiple LDAP servers in CUCM.
- You can join the AD LDS server(s) to any one of your domains, doesn’t really matter as long as you have Domain Trusts in place between the domain where the AD LDS instance is hosted, and the other domain(s) that host user accounts. Read the “Domain Trust Relationship” section in the Cisco guide for more information.
- Create a domain based Service Account (in the domain you deployed LDS in) to run the AD LDS instance and make this user a local Administrator on each LDS server you deploy.
- Turn off UAC on each LDS server you deploy, I will not get into the details of it, but had issues writing into the LDS directory (C:\Windows\ADAM) when logged in with the dedicated Service Account (which you will need to login with when carrying out LDS operations).
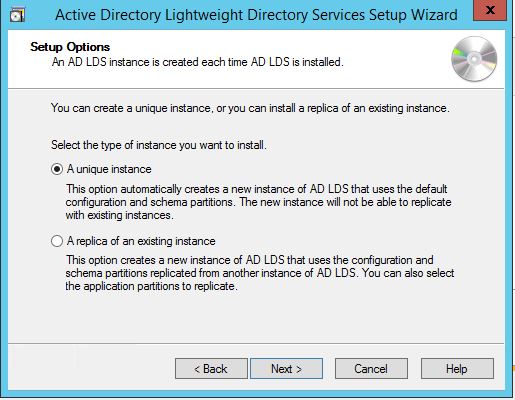
2. Deploy AD LDS:
Logon with the Service Account, install the AD LDS role using Server Manager and then start the AD LDS wizard.
Select the “A unique instance” option, select the “A replica of an existing instance” option if you’re deploying a secondary LDS server.
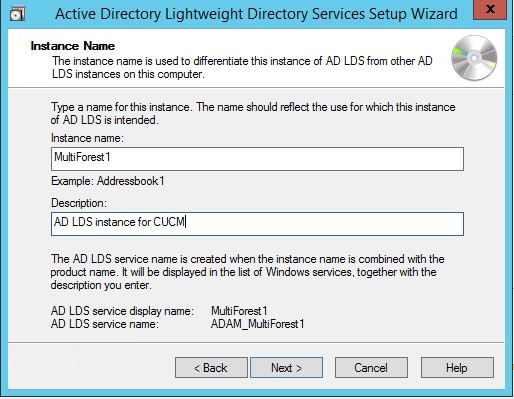
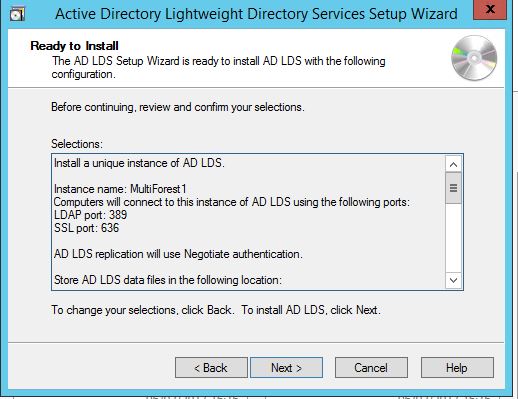
Give the instance a name and description. Bare in mind you can run multiple instances on the same LDS server, each instance must have an unique name.
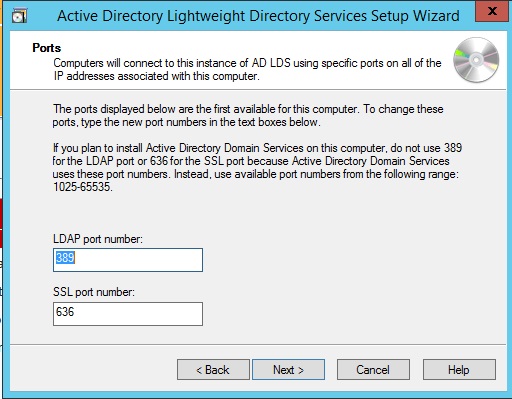
I’ve used the standard LDAP ports as they were available on the server I was deploying the instance on.
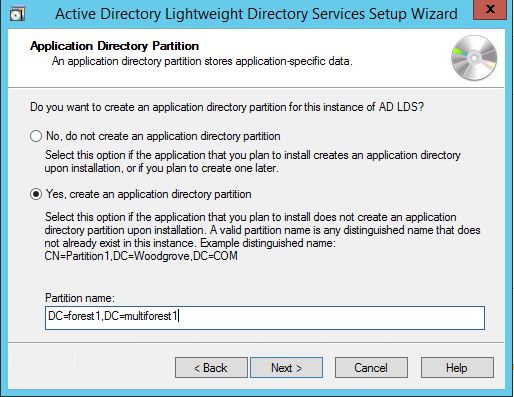
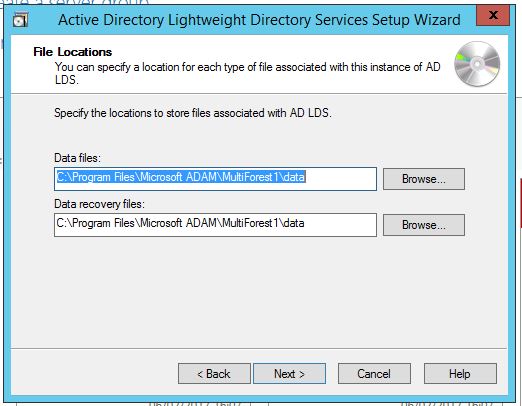
Create an application directory. I’ve chosen the distinguished name: dc=forest1,dc=multiforest1 as my partition name. If I were to deploy a second partition on the same instance (for another purpose), I would use the distinguished name: dc=forest2,dc=multiforest1. Enter whatever name that works for you.
IMPORTANT NOTE – The distinguished name you define on this step will be apart of your search base under CUCM.
Leave as is.
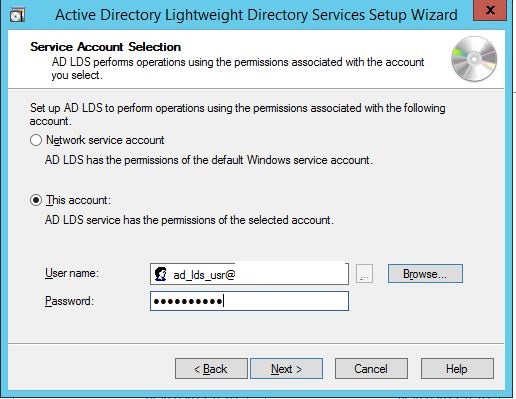
Enter the AD LDS Service Account credentials.
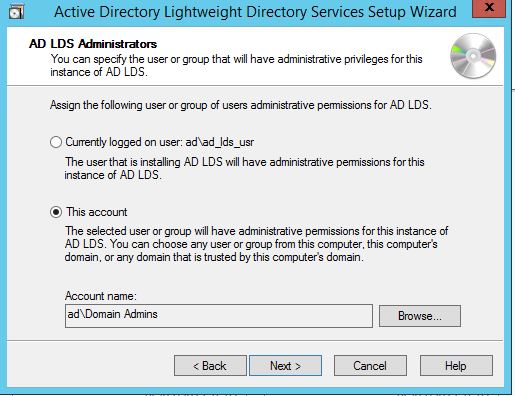
Define a Security Group which will have administrative privileges for the AD LDS instance. I’ve defined the Domain Admins group located in the forest the LDS server is deployed in.
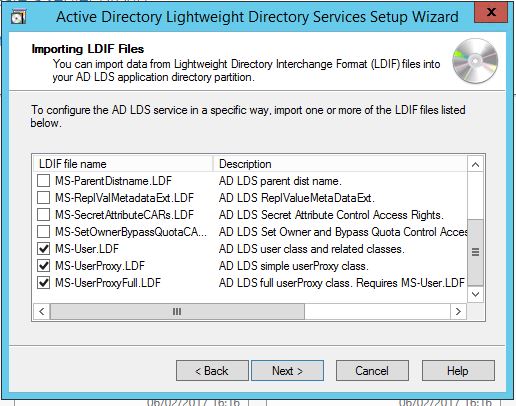
Check the MS-AdamSyncMetadata.LDF, MS-InetOrgPerson.LDF, MS-User.LDF, MS-UserProxy.LDF, and MS-UserProxyFull.LDF boxes.

Click Next to deploy the instance.
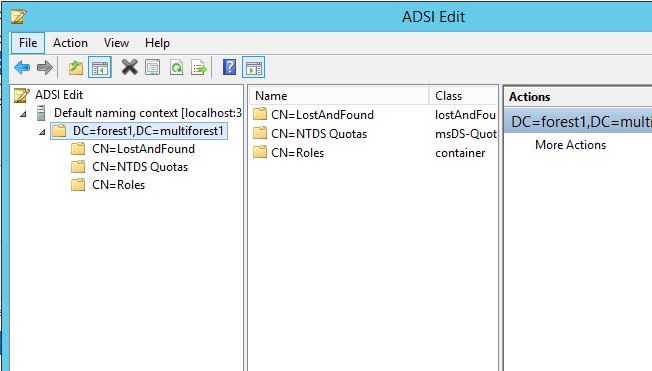
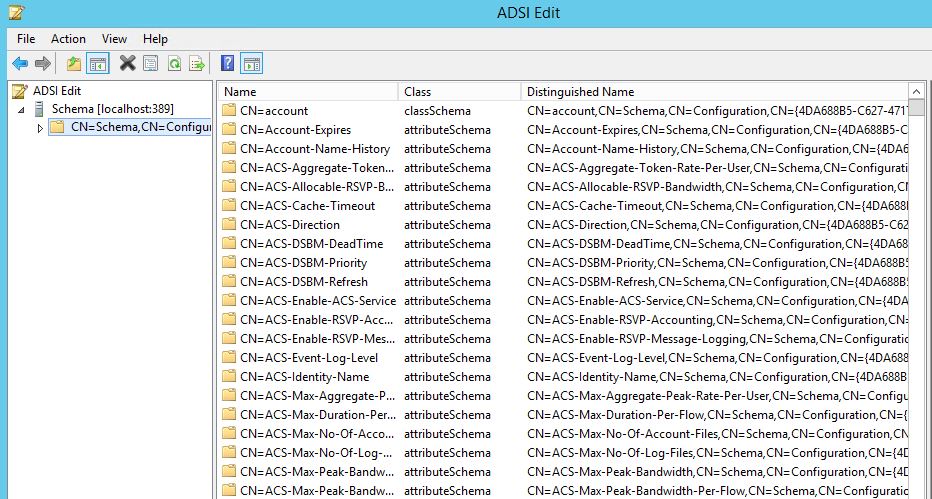
Once the wizard completes its process and the instance is installed successfully, start ADSI Edit, connect to the instance and view the Application Directory Partition.
3. Copy Schema from domain to AD LDS:
This process is covered in the Cisco guide (Configure ADAM Schema Analyzer section) in detail, follow the steps in the guide.
My Recommendations:
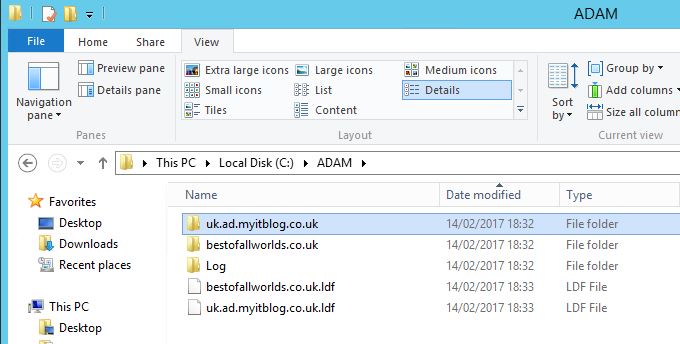
- Create a folder called ADAM in the C drive of the AD LDS server, create a folder called Log, and a folder for each of your domains within the ADAM folder. Under each domain folder also create a folder called Log.
- When loading the target schema using ADSchema Analyzer, provide the credentials of an account located in the domain you loading the Schema of.
- You need repeat the steps in the guide for each domain you want CUCM to get user information and perform authentication from. If you refer back to the Goal section (at beginning of this post), I’ve defined 2 domains (uk.ad.myitblog.co.uk and bestofallworlds.co.uk) as the domains containing the User accounts I want to import to CUCM. So in that case we would run the ADSchema Analyzer procedure twice and produce 2 separate LDF files containing the Schema information for each of the 2 domains.
- Save the files in the root of the ADAM folder located under the C drive.
4. Import the LDIF Schema created using the ADSchema Analyzer:
Open Command Prompt and run the following command for each LDF file you created.
ldifde -i -s localhost:389 -c CN=Configuration,DC=X #ConfigurationNamingContext -f c:\ADAM\uk.ad.myitblog.co.uk-Schema.ldf -j c:\ADAM\Log -k
ldifde -i -s localhost:389 -c CN=Configuration,DC=X #ConfigurationNamingContext -f c:\ADAM\bestofallworlds.co.uk-Schema.ldf -j c:\ADAM\Log -k
My Recommendations:
- This is not in the Cisco guide, use the -k parameter. The -k parameter allows the import operation to ignore errors. Without it, the import process will stop on the first error it encounters (if any errors are encountered) and you will get into all sorts of issues when syncing the directory content. You can find all ldifde command parameters in this link.
- Check the Log file located under the Log directory (root of C:\ADAM folder) for errors once each import is complete.
- You can browse the LDS instance Schema using ADSI Edit once the import is complete. you will realize that the Schema is extended.
5. Extend the AD LDS Schema with the User-Proxy Objects:
Open a text file, copy the content below into it and save it as MS-UserProxy-CUCM.LDF (under the root of the C:\ADAM folder).
#==================================================================
# @@UI-Description: AD LDS simple userProxy class.
#
# This file contains user extensions for default ADAM schema.
# It should be imported with the following command:
#   ldifde -i -f MS-UserProxy.ldf -s server:port -b username domain password -k -j . -c "CN=Schema,CN=Configuration,DC=X" #schemaNamingContext
#
#==================================================================

dn: CN=User-Proxy,CN=Schema,CN=Configuration,DC=X
changetype: ntdsSchemaAdd
objectClass: top
objectClass: classSchema
cn: User-Proxy
subClassOf: top
governsID: 1.2.840.113556.1.5.246
schemaIDGUID:: bxjWYLbzmEiwrWU1r8B2IA==
rDNAttID: cn
showInAdvancedViewOnly: TRUE
adminDisplayName: User-Proxy
adminDescription: Sample class for bind proxy implementation.
objectClassCategory: 1
lDAPDisplayName: userProxy
systemOnly: FALSE
possSuperiors: domainDNS
possSuperiors: organizationalUnit
possSuperiors: container
possSuperiors: organization
defaultSecurityDescriptor:
D:(OA;;CR;ab721a53-1e2f-11d0-9819-00aa0040529b;;PS)S:
defaultHidingValue: TRUE
defaultObjectCategory: CN=User-Proxy,CN=Schema,CN=Configuration,DC=X
systemAuxiliaryClass: msDS-BindProxy
systemMayContain: employeeNumber
systemMayContain: givenName
systemMayContain: mail
systemMayContain: msDS-UserAccountDisabled
systemMayContain: objectSid
systemMayContain: objectClass
systemMayContain: sn
systemMayContain: samAccountName
systemMayContain: telephoneNumber
systemMayContain: userPrincipalName

dn:
changetype: modify
add: schemaUpdateNow
schemaUpdateNow: 1
-
This file is a modified version of the MS-UserProxy.LDF file (located under C:\Windows\ADAM).
The section I’ve added in is shown below. Modify depending on the attributes you need LDS to import on a per User account basis.
systemMayContain: employeeNumber
systemMayContain: givenName
systemMayContain: mail
systemMayContain: msDS-UserAccountDisabled
systemMayContain: objectSid
systemMayContain: objectClass
systemMayContain: sn
systemMayContain: samAccountName
systemMayContain: telephoneNumber
systemMayContain: userPrincipalName
Open a Command Prompt and import this MS-UserProxy-CUCM.LDF
ldifde -i -s localhost:389 -c CN=Configuration,DC=X #ConfigurationNamingContext -f c:\ADAM\MS-UserProxy-CUCM.ldf -j c:\ADAM\Log -k
IMPORTANT NOTE – This step, which is also detailed in the Cisco guide (Extend the AD LDS Schema with the User-Proxy Objects section) did not work for me. As far as I understand, the purpose of this step is to add the particular attributes to the UserProxy class as optional attributes. No clue why it didn’t work. I had to add them in manually. The process for adding the attributes manually is detailed in the next section.
6. Add optional attributes to UserProxy Attribute Class:
Open a Command Prompt with elevated privileges and run the following command.
regsvr32 schmmgmt.dll
This will install the Active Directory Schema Snap-in.
Open MMC, load the Active Directory Schema Snap-in, connect to the AD LDS instance and navigate to the UseProxy attribute class.
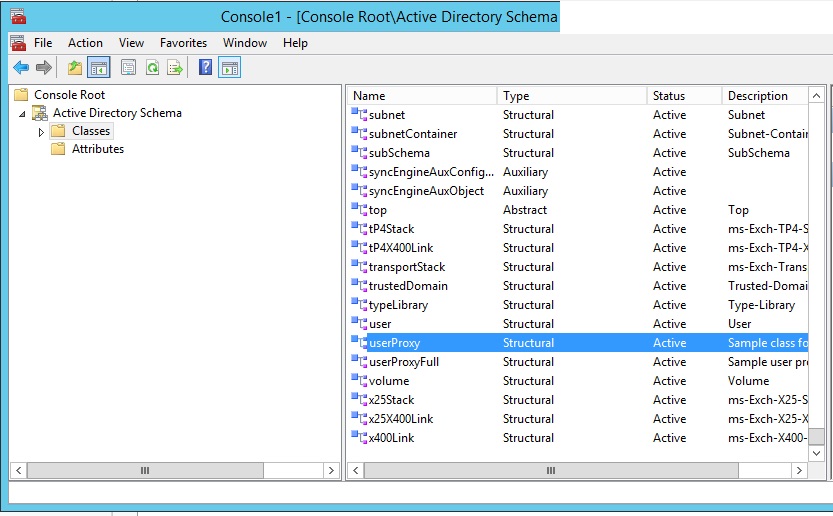
Right-click the UserProxy class, and click Properties, navigate to the Attributes tab.
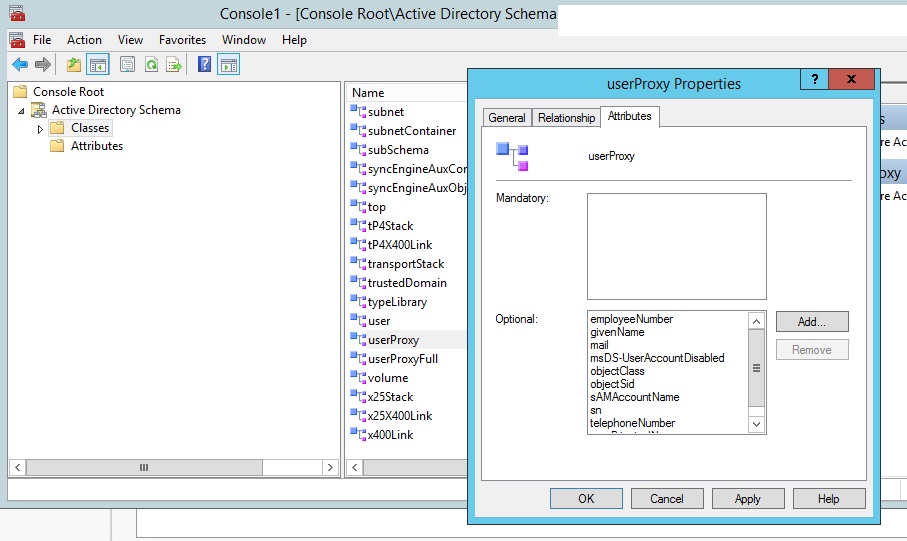
Add all the attributes listed below as Optional class attributes, click OK.
IMPORTANT NOTE – If you add any other attributes to your MS-UserProxy-CUCM.LDF file you created earlier, other than the ones below, you will also need to add those attributes to the UserProxy class.
systemMayContain: employeeNumber
systemMayContain: givenName
systemMayContain: mail
systemMayContain: msDS-UserAccountDisabled
systemMayContain: objectSid
systemMayContain: objectClass
systemMayContain: sn
systemMayContain: samAccountName
systemMayContain: telephoneNumber
systemMayContain: userPrincipalName
7. Import the Users From AD DC to AD LDS:
Now we are ready to import the users from the various domains into AD LDS.
Before we can do so however, we need to create a config file for each domain and save it under the domain specific folder located in C:\ADAM.
Open a text file, copy the content below into it, modify the domain specific tags and save it as MS-AdamSyncConf-DOMAIN-NAME.XML. Repeat this process for each of your domains.
Please read the comments in the xml file for details on the specific tags in the config.
<?xml version="1.0"?> <doc> <configuration> //Just a description <description>uk.ad.myitblog.co.uk</description> <security-mode>object</security-mode> //Enter the domain name of the domain you're importing Users from <source-ad-name>uk.ad.myitblog.co.uk</source-ad-name> //Enter the DN of the domain you're importing Users from <source-ad-partition>DC=uk,DC=ad,DC=myitblog,DC=co,DC=uk</source-ad-partition> //Enter a User account located in the domain you're importing Users from (only required when using ADAMSync with /passprompt parameter) <source-ad-account></source-ad-account> //Enter the domain name of the domain the User account is located in (only required when using ADAMSync with /passprompt parameter) <account-domain></account-domain> //Enter the DN of the LDS partition <target-dn>DC=forest1,DC=multiforest1</target-dn> <query> //Enter the DN of the User OU located in the domain you're importing Users from, this value will vary depending on your OU structure and which User accounts you want to import, if you want you can enter the same value as the source-ad-partition, modify depending on what works for you. <base-dn>OU=UKmyitblog-Users,DC=uk,DC=ad,DC=myitblog,DC=co,DC=uk</base-dn> //The filter value will also vary depending on which User accounts you want to import. I've set my criteria to only import User accounts which are not disabled, and accounts which have populated employee number and TelephoneNumber attributes. Modify depending on what works you. <object-filter> (|(&amp;(objectClass=user)(objectCategory=person)(|(employeeNumber=IT*)(employeeNumber=BW*))(telephoneNumber=*)(!(userAccountControl:1.2.840.113556.1.4.803:=2)))(objectCategory=OrganizationalUnit)) </object-filter> <attributes> <include>employeeNumber</include> <include>givenName</include> <include>mail</include> <include>msDS-UserAccountDisabled</include> <include>objectSid</include> <include>objectClass</include> <include>sn</include> <include>samAccountName</include> <include>telephoneNumber</include> <include>userPrincipalName</include> <exclude></exclude> </attributes> </query> <user-proxy> <source-object-class>user</source-object-class> <target-object-class>userProxy</target-object-class> </user-proxy> <schedule> <aging> //Set to 1 in one of your config files and to 0 in the other config files <frequency>0</frequency> <num-objects>0</num-objects> </aging> <schtasks-cmd></schtasks-cmd> </schedule> </configuration> <synchronizer-state> <dirsync-cookie></dirsync-cookie> <status></status> <authoritative-adam-instance></authoritative-adam-instance> <configuration-file-guid></configuration-file-guid> <last-sync-attempt-time></last-sync-attempt-time> <last-sync-success-time></last-sync-success-time> <last-sync-error-time></last-sync-error-time> <last-sync-error-string></last-sync-error-string> <consecutive-sync-failures></consecutive-sync-failures> <user-credentials></user-credentials> <runs-since-last-object-update></runs-since-last-object-update> <runs-since-last-full-sync></runs-since-last-full-sync> </synchronizer-state> </doc>
Once you have all your config files ready, navigate to C:\Windows\ADAM, right click holding the shift key and click Open command window here.

Install the config file for your first domain by running the following command (modify for your environment).
ADAMSync /Install localhost:389 C:\ADAM\uk.ad.myitblog.co.uk\MS-AdamSyncConf-uk.ad.myitblog.co.uk.XML /log c:\ADAM\uk.ad.myitblog.co.uk\log\Install.log
The log located within the domain log folder should look like this once you hit enter:
Adamsync.exe v1.0 (6)
Establishing connection to target server localhost:389.
Reading Configuration File from C:\ADAM\uk.ad.myitblog.co.uk\MS-AdamSyncConf-uk.ad.myitblog.co.uk.XML
Saving Configuration File on DC=forest1,DC=multiforest1
Attaching configuration file auxilliary class on DC=forest1,DC=multiforest1.
Saved configuration file.
Done.
Done.
You can check what config is installed by running the following command.
adamsync /list localhost:389
IMPORTANT NOTE – You can run ADAMSync with the /passprompt parameter provided you defined the User account in the config file. This parameter is a debugging tool used “I think” when you don’t have domain trusts in place. Just be aware that, when you hit enter on the command (including the /passprompt parameter), you won’t be prompted to enter the password, you will only get a flashing cursor, just enter the password and hit enter.
ALSO NOTE – If you configure ADAMSync to replicate the AD information to an LDS partition, without aging, deleted data from AD will never be removed from LDS. You enable aging in the config file by setting the frequency tag value to 1, the reason I’ve suggested you set this tag to 1 in one config file, and to 0 in others, is because the aging run will remove all user objects which it can no longer find in AD. Now because we are syncing user objects from multiple domains into the same partition, when the aging run occurs it will remove all objects that belong to the other domains. So each time you will need to first run the sync for the domain with aging in its config file set to 1, then run the sync for the other domains.
Once you’re happy with the config installation process, you can run the following command to import the users (sync the directories).
ADAMSync /sync localhost "DC=forest1,DC=multiforest1" /log c:\ADAM\uk.ad.myitblog.co.uk\log\sync.log
This will take time depending on the number of Users you’re importing.
Running the command with the \ldap option (debugging parameter) will do a full sync via normal ldap search.
ADAMSync /sync localhost "DC=forest1,DC=multiforest1" /log c:\ADAM\uk.ad.myitblog.co.uk\log\sync.log \ldap
The log located within the domain log folder should end with something similar:
Finished (successful) synchronization run.
Number of entries processed via dirSync: 0
Number of entries processed via ldap: 2344
Processing took 7 seconds (0, 0).
Number of object additions: 2344
Number of object modifications: 0
Number of object deletions: 0
Number of object renames: 0
Number of references processed / dropped: 0, 0
Maximum number of attributes seen on a single object: 11
Maximum number of values retrieved via range syntax: 0
Beginning aging run.
Aging requested every 0 runs. We last aged 1 runs ago.
Saving Configuration File on DC=forest1,DC=multiforest1
Saved configuration file.
IMPORTANT NOTE – The user which you install the config with must also be the user which you run the sync with. Otherwise you will get an error and ADAMSync will crash.
Repeat the install and sync procedure for your other domains.
Once you complete the procedure for all your domains, using ADSI Edit check to see if the LDS instance is populated with the OUs defined in your config files.
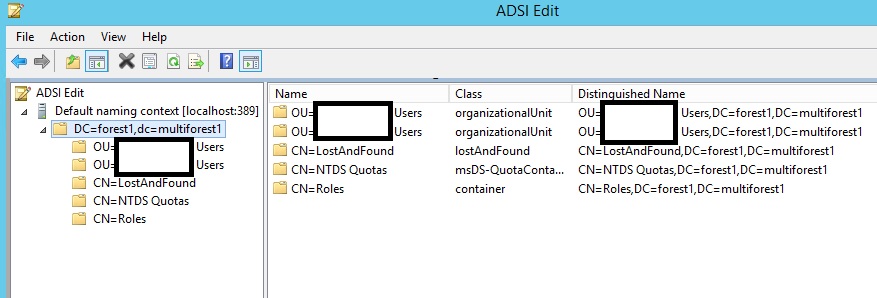
Alternatively, you can open up any LDAP browser and point it to the LDS partition (DC=forest1,DC=multiforest1), and run a LDAP query.
IMPORTANT NOTE – When LDS imports an active User account on its next sync cycle, and then that account is disabled in AD, the new status of the User account is not reflected to the LDS object on the following sync cycle. Now I think this because no matter what, the msDS-UserAccountDisabled attribute is not being populated in LDS. From what I’ve been reading, msDS-UserAccountDisabled is not supported in AD, as a matter of fact, the attribute doesn’t even exist in AD, AD uses the UserAccountControl attribute instead. So LDS supports msDS-UserAccountDisabled and AD supports UserAccountControl. This peculiarity creates a problem when importing users into CUCM, as ideally User accounts which are disabled in AD shouldn’t get imported. So my work around was to create an OU (called DisabledUsers) outside the OU my config file is pointing at, and to move User accounts which are disabled on a “permanent basis” into it. With aging configured, on the next sync cycle LDS removes the disabled User accounts from its directory and consequently CUCM also removes them from its directory. Any User account disabled on a temporary basis doesn’t need to be moved to the DisableUsers OU as we wouldn’t want those users to be deleted from the LDS and CUCM directories. Because all authentication requests are proxied across to AD, those users wouldn’t be able to access CUCM sites.
At this point, you will want to automate the import process using a batch file and Windows Task Scheduler.
Your batch file should look something like this:
"C:\Windows\Adam\ADAMSync" /Install localhost:389 C:\ADAM\uk.ad.myitblog.co.uk\MS-AdamSyncConf-uk.ad.myitblog.co.uk.XML /log c:\ADAM\uk.ad.myitblog.co.uk\log\Install.log
"C:\Windows\Adam\ADAMSync" /sync localhost "DC=forest1,DC=multiforest1" /log c:\ADAM\uk.ad.myitblog.co.uk\log\sync.log
"C:\Windows\Adam\ADAMSync" /Install localhost:389 C:\ADAM\bestofallworlds.co.uk\MS-AdamSyncConf-bestofallworlds.co.uk.XML /log c:\ADAM\bestofallworlds.co.uk\log\Install.log
"C:\Windows\Adam\ADAMSync" /sync localhost "DC=forest1,DC=multiforest1" /log c:\ADAM\bestofallworlds.co.uk\log\sync.log
My Recommendations:
- Ideally your base-dn defined in the config file should be an User OU. Setting the base-dn to point at the root of the directory will work but you may run into syncing issues (I did, some Exchange Public Folder objects were creating issues).
- The filter in the config file can eliminate certain User accounts such as Service Accounts or Disabled Accounts from being imported into LDS. If your AD directories are large in size, you wouldn’t want to import those User accounts that don’t need to be imported.
- Aging runs are useful in keeping the LDS directory tidy however, as I’ve mentioned previously only run aging for one domain.
- Create the Windows Task Scheduler jobs to run using the LDS Service Account
8. Create User in AD LDS:
Before you can configure CUCM to get user information from the LDS instance, you need to create an user account in the instance with administrative rights.
This process is covered in the Cisco guide (Create the User in AD LDS for CUCM Synchronization and Authentication) in detail, follow the steps in the guide.
9. Configure Bind redirection:
By default, binding to ADAM with bind redirection requires an SSL connection. SSL requires the installation and use of certificates on the computer that runs ADAM and on the computer that connects to ADAM as a client. If certificates are not installed in your ADAM test environment, you can disable the requirement for SSL as an alternative.
By default, SSL is enabled. In order to make the LDAPS protocol work in ADAM/LDS you will need to generate a certificate.
If you don’t install certificates on the LDS instance (using the procedure detailed in the Cisco guide), you won’t be able to proxy User authentication requests to AD and your users will fail to logon to CUCM sites.
Best Practice dictates that you implement certificates and secure traffic, however here is how to disable SSL on the LDS instance.
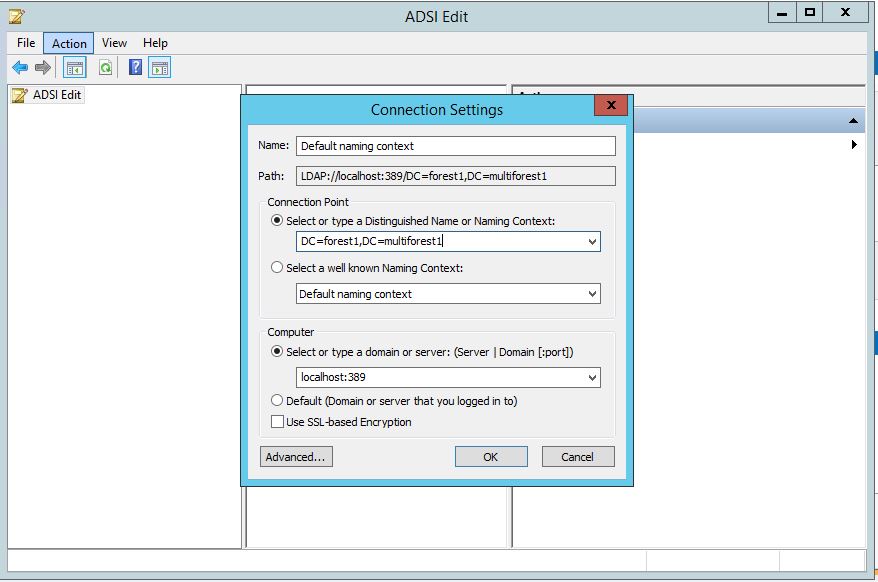
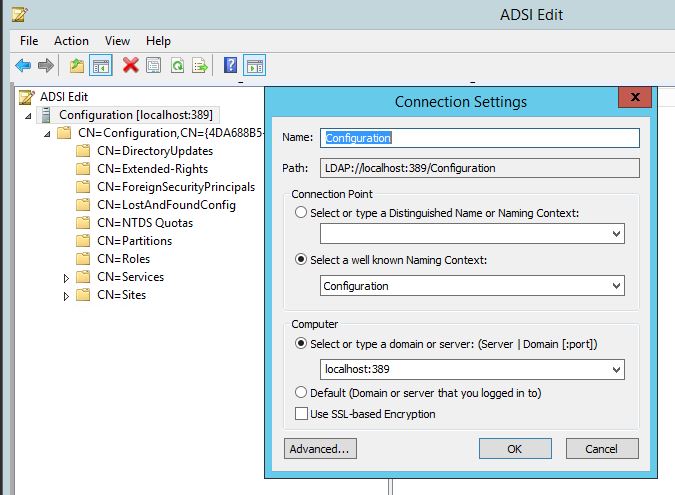
Start ADSI edit on the LDS server and connect to the instance with connection settings displayed in the image below.
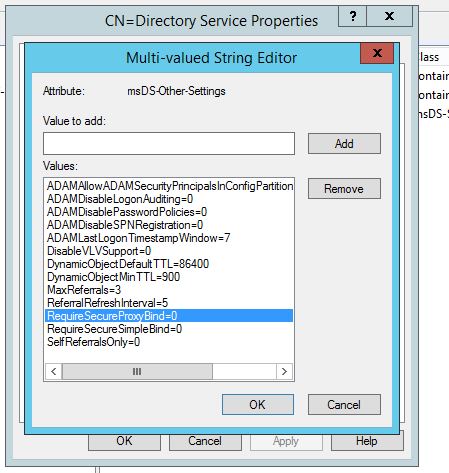
Navigate to CN=Directory Service, right-click it then click Properties.

Find the msDS-Other-Settings attribute and double click it. Change RequireSecureProxyBind=1 value to 0. Click OK, then OK again.
10. Configure CUCM:
This process is covered in the Cisco guide (Configure CUCM) in detail, follow the steps in the guide.
IMPORTANT NOTE – Depending on how you want to handle disabled User accounts, you may not need to include the msDS-UserAccountDisabled attribute in your filter.
Hi,
This article has been very helpful in implementing LDS for CM.
I have setup LDS and its populating users from AD to LDS instance. However, users are not able to authenticate to ccmuser portal.
Question.
For multiple domains each with multiple OUs, would you use ldap.exe to add childs?
For instance, if LDS instance is configured as DC=Forest1,DC=MF1, then for each domain would you add a child using ldap such as :
DC=DomainA,DC=Forest1,DC=MF1 (import users in this child for this domain)
DC=DomainB,DC=Forest1,DC=MF1 ((import users in this child for this domain)
Adamsync /sync and /install will be for each child
In, CM , set authentication to DC=Forest1, DC=MF1
In CM, set LDAP dir for each domain as:
DC=DomainA,DC=Forest1,DC=MF1
DC=DomainB,DC=Forest1,DC=MF1
Great article and one I commonly refer to when explaining the need for LDS. I had a question today that I couldn’t necessarily answer as I’m not an AD expert. The question was what if I setup a trust between my two domains. Could I then just point to the one without having to use an LDS server? Unfortunately I could not answer but was hoping you could help me understand it a little better?
Hey Jamin,
First of all sorry for the late reply, unfortunately I haven’t dealt with LDS for so long now (and don’t remember the steps anymore), but from what I can remember, what you are suggesting won’t work… LDS allows you to make a copy of your directory (minus passwords) and then proxy authentication requests to the actual AD, without the objects for the secondary domain in LDS database, you wouldn’t be able to authenticate users for the secondary domain – so you would have to carry out the steps detailed in blog for each of your domains. I do remember doing that for the client I was working for, they had multiple domains.
Hope this helps…
Good tutorial, I will test in my lab.
Finally I have found step-by-step guide how to deal with LDS.
thanks
Great tutorial.
I would like to add one addition to the whole process so you do not need to waste your time troubleshooting. When you configure on CUCM side LDAP integration, set LDAP type to ADAM/LDS and choose the “LDAP Attribute for User ID”. Do NOT use userPrincipalName if you want to use also user authentication against LDAP. As this will disable the option to set a custom user search base under LDAP authentication parameters. There is a severity 6 enhancement for this: CSCva11632. But till it gets implemented – i suggest to use something different, like mail.
P.S. At least on CUCM 11.5 – this works strange, user auth seems to work for self-care portal and other web services, but for example for CTI service this fails and in logs you can see it uses an incorrect LDAP search base.
Finally a good tutorial!!
I whittled the attributes down to the following in the modified MS-UserProxy.ldf and was able to successfully import. I took out what I flat out didn’t care about and then the bits that would cause a failure. SamaccountName was one that caused a failure.
systemMayContain: givenname
systemMayContain: mail
systemMayContain: sn
systemMayContain: givenName
systemMayContain: middleName
systemMayContain: sn
systemMayContain: telephoneNumber
systemMayContain: mail
systemMayContain: title
systemMayContain: msDS-UserAccountDisabled
systemMayContain: displayName
systemMayContain: uid
Though, it didn’t help. It seems that the attributes that I need don’t exist in LDS and I can’t currently add them. They are not available for selection in the attribute addition on the userproxy objectclass.
Hi Everyone,
Just to share, in case you are looking for LDAP authentication for different domains in the same forest:
DC=DomainA,DC=Forest1,DC=MF1
DC=DomainB,DC=Forest1,DC=MF1
DC=DomainC,DC=Forest1,DC=MF1
Just point to the AD That’s part of the global catalog and set the port for the 3268.
https://knowledge.broadcom.com/external/article/159433/ldap-lookup-against-ad-with-multiple-dom.html
Please Please Help Me
Ldap Authentication not working in CUCM for ADLDS Configuration.
what is the issue? :((((
Hello, thank you for the great guide, but I’m having a little problem.
What if we have multiple forest with the same OU names? In my test subsequent sync will overwrite the previous OU content, deleting the users. Is there a way to avoid this problem? Maybe we shoud create different partitions in LDS and modify the MS-AdamSyncConf-DOMAIN-NAME.XML accordingly?.
Thanks
What steps do I need to complete if I am cho0sing to replicate an existing instance vs. starting from scratch here?
Going from Server 2008 instance to 2019 box.